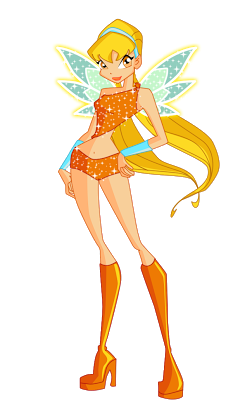
Winx Club - Stella Cosplay Tutorial!
- Abby Andrew
- Jan 2, 2020
- 4 min read
Updated: Nov 23, 2020

Stella from the Winx Club is a character I've wanted to cosplay for so long, but before getting into cosplay more seriously, the fact that I couldn't just BUY the costume pieces seemed like the end of the line, because making my own pieces seemed far too daunting.
This year for Halloween, I finally decided to take the plunge, teach myself how to make the costume, and hope for the best. Clearly, based on all the items I had on standby as backup plans, I definitely didn't expect my DIY pieces to come together so well...!
The wig I used was just a cheap costume wig, but it worked for the look.
Materials
Initially, I was between two different fabrics:
My first instinct was to purchase the fabric on the right because I liked the sequins and it felt fitting for a glittery fairy costume. I was so sure of my decision that I ordered 3 yards for a total of about $17.
Since I was a bit less confident in my ability to make the shorts, I decided to purchase a pair of shorts ($30) made out of the fabric on the left from Coquetry Clothing to use as a base and/or backup plan, which I had planned to put the right-side fabric over.

However, when I received the sequin fabric and the jewel fabric shorts in the mail, I realized I had made the wrong fabric decision.
The sequin fabric, while still pretty in person, wasn't as vibrant as I had expected it to be (mainly because it was more sheer than expected), while the sparkly jewel fabric was breathtakingly bright.
Plus, my plan to pair the two fabrics wouldn't have worked out very well, because the fabrics were slightly different shades of orange in person (see video for reference).
So I ended up buying 2 yards of the orange jewel fabric from Coquetry Clothing after all ($26 for 2 yards, whereas the other fabric was $17 for 3.. so that's definitely something to take into account.)
(Not-sponsored, but you can use my referral link to Coquetry Clothing for 10% off!)
The Sewing Machine
Now remember: this was my first sewing project in a LONG time.. so I also had to purchase a sewing machine! Something easy-to-learn for beginners, simple, relatively cheap, and COMPACT so that it was easy to store in my tiny NYC apartment.
After much thought and research, I decided on the KPCB Mini Sewing Machine for just under $30

It arrived pre-threaded, and after watching a few YouTube tutorials, it was super simple to figure out how to use from the perspective of a complete beginner.
Note that this sewing machine ONLY does a straight stitch, and doesn't even stitch backwards, but it was completely perfect for my needs, especially considering the compact size and cost.
Here are the video tutorials I used to learn how to use the sewing machine:
These two are a good overview:
Threading the machine:
Making the Shirt:
I'm just going to give a brief overview of how I made the shirt, and also link some video tutorials that I followed to help me learn how.
First, I traced a garment that fit me really well onto the fabric. I had a shirt that was a similar, one-strap style that I traced, but you can also use a sports bra that fits you well. (Trace with something light! I used a sharpie which linked through the fabric a bit 😅)
Leave room for seam allowance! About 1-2 inches.

Fold the fabric over so that you're cutting out two pieces of the same shape.
With the garment inside out (the parts you want outside should be touching each other), pin the places where you want to sew. (I actually pinned mine before cutting, but either way works.)

Sew! Take your time, and remove the pins as you get to them. This might be obvious, but don't sew together the parts that need to be left open, like the arm hole etc. ... I'm only mentioning it because I messed that part up at first 😹
Since this particular machine only does a straight-stitch, I recommend going over it 2, maybe even 3 times to make sure it is secure.
Lastly, if you want to make your piece more professional looking, be sure to add a hem to all the edges of the fabric that weren't sewn together. Pin the edges up about 1/4 - 1/2 inch and sew.

Video I followed:
Boot Covers
This part was actually really fun, and not too hard to do! I'm not going to list step-by-step instructions for this one because I followed these tutorials pretty closely.
Personally, I did a lot of trial and error. I did a rough outline and sewed it together, tried it on the boot, made adjustments, and stitched it some more as necessary until I was satisfied with it.
I highly recommend putting a boot grip on the bottom, ESPECIALLY if you're wearing this costume to a con where the floors might be slippery!!
Videos I followed:
Back up shirt that I didn't end up using: -Orange one-strap top from SheIn

(This post is NOT sponsored, however it does contain Amazon affiliate links, which allow me to get a small percentage of commission with no added cost to you- if you do decide to purchase this sewing machine, using my link would be a much appreciated way to support my blog! 😊)


I did sew the skirt and the top together. I just made a long rectangular section of pleats and stitched it to the bottom hem of the dress. There is a zipper in the center back also. Good luck with your outfit! https://yourcosplay.de/